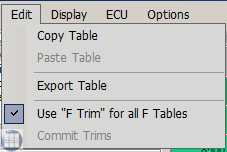
Modifica Mappe
This description was created for the Windows version of TuneECU and can be appliedlargely on the Android version.
Learning video on You Tube in English
Selezionando
la modalità di modifica mappe per la prima volta, TuneECU vi chiederà
di accedere ad un file contenente una mappa (.hex specifico per la
moto, scaricabile in Rete) o di leggere direttamente la mappa contenuta
nella centralina. Ad
ogni successivo riavvio di TuneECU, sarà mostrata l'ultima mappa aperta.
Si
presti attenzione a selezionare una mappa che corrisponda al modello di
moto ed alla sua configurazione (ad esempio il tipo di scarico montato).
<MENU> Display- Map Infos
Quando si seleziona una mappa come in figura 6, i dettagli della mappa (tipo di moto, tipo di scarico, commenti, etc.) sono visualizzati e possono essere aggiornati dalla casella di testo, modificandoli direttamente, e quindi salvati come parte della mappa (in formato . Hex).
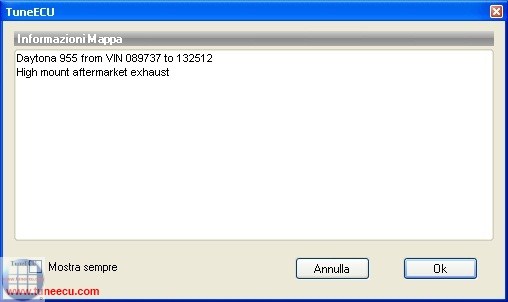
Fig.
6
Centralina KEIHIN
- Selezionare una mappa:-
<Menu>-File -
Open Map File: e selezionare una mappa da caricare dalla
periferica di archiviazione.
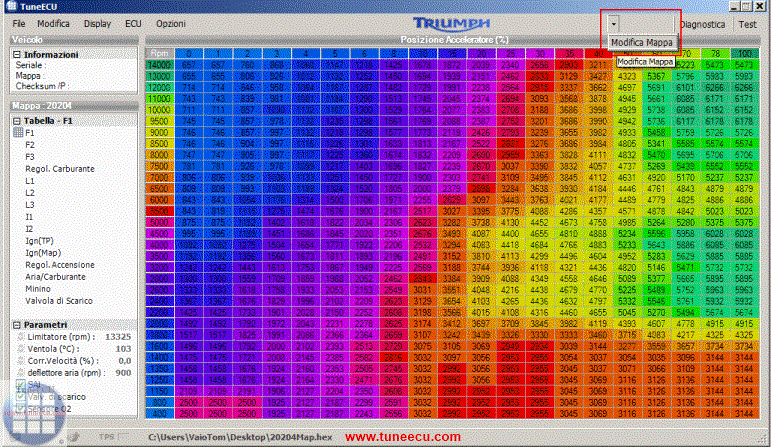
Fig.7
Fig 7:(In alto a sinistra) Informazioni ECU: Numero di serie, identificativo della mappa, checksum e riprogrammazione dei parametri.
|
|
Numero di serie, identificativo
della mappa, checksum e riprogrammazione dei parametri. Click in this field to see information from the second ECU (K?M 690). |
Sono presenti varie tabelle che
compongono la
mappa (fare clic sul nome della tabella per selezionarla):
-
F1-4: le tabelle primarie di carburante per i cilindri 1,2,3 e 4 (rappresentate in funzione del numero
di giri - RPM - e della percentuale di apertura dell'acceleratore ) .or F3-1 corresponding to the
position of the mapping switch on the K?M 690. -
Fuel trim: Regolazione della quantità di carburante per le tabelle "F" (in %).
Right click on a F table, if not visible, e.g. K?M 690 -
L1-4: tabelle relative alla quantità di carburante per l'apertura dell'acceleratore al minimo (rappresentate
in funzione del numero di giri - RPM - e del carico del motore, derivato dalla pressione letta nel
collettore di aspirazione). L3-1 for K?M 690
Queste tabelle sono utilizzate al posto delle tabelle primarie del carburante "F" quando l'apertura dell'acceleratore è inferiore al 6%. Le tabelle sono 3 e sono relative alla pressione in ogni collettore di aspirazione. -
I1-4: Tabelle relative all'anticipo di accensione. I3-1 and I-LOF (Low Octane Fuel) for K?M690
I-Tables, Daytona 675, at these model, are the I-tables depending on the selected gear.
I (1st) = 1. gear, I (2 - 5th) = 2. - 5. gear, I (6th) = 6. gear and I (N) = Neutral - ETV = Electronic
Throttle Valve:
The ETV tables are only tables for the gear ratio of the throttle grip to the stepper motor that moves
the throttle valves (0-100%).
These tables are for the different driving modes (e.g. Rain, Tour and Race) for the ETV models e.g.
from Triumph, there are further tables for each selected driving mode, which operate depending on
the gear selected.
For the following description, the map of a Triumph Street Triple 765 was used as an example.
Stepper value 0 in the ETV table = throttle valves closed.
Stepper value 1680 in the ETV table = throttle valves fully open (100%)
The stepper motor on this model has 1680 steps as a step to open the throttle valves 100%.
Means: 100/1680 = 0.058 .. - The stepper motor can vary the throttle position to approximately 0.06% accurate. -
Ignition trim: Regolazione delle tabelle di anticipo dell'accensione (gradi °).
or Right click on a I table, if not visible, (e.g. K?M 690) -
Air/fuel: Rapporto della miscela di aria/carburante (AFR, rapporto stechiometrico)
-
Engine idle: Regime del minimo in funzione della temperatura.
-
Exhaust Valve (Daytona 675): La posizione della valvola di scarico in funzione del numero di giri/min.
-
Second butterfly (Daytona 600, 650, Rocket III & K?M):
La posizione delle valvole a farfalla secondarie in funzione del numero di giri e rapporto del cambio. -
Change-over F-L: la transizione dalle tabelle F a L, e viceversa (in funzione del numero di giri e della percentuale di apertura dell'acceleratore).
For Benelli models: TnT Sports, TNT CR, TreK1130, TnT standard (05/06) and TNT R160.
For the models, TnT Sport, TnT CR, and TnT TreK1130 standard (05/06), Map1 (I & F)
the maps is for reduced fuel consumption = reduced performance. Map0 (I &F) is for open
performance and maximum torque.
For the TNT R160, Map1(I & F) is for use with DB-killer, and Map0 the map is for operating
WITHOUT DB-Killer, Map0 (I & F) is not suitable for use with DB killer. (Source http://www.benelli-info.de) - I
parametri di una mappa:
Limitatore di giri RPM, soglia di intervento temperatura (Accensione Ventilatore), Regolazione della
lettura del tachimetro (tra 0% e il -6% di regolazione), Limitatore di velocità (Rocket III), Air Flap &
Exhaust Valve Daytona 675, cutoff time Quick Shifter (Daytona675 from model 2009),portata
dell'iniettore e rapporto stechiometrico A/F desiderato (Sagem).
La barra di stato visualizza la tensione della batteria, lo stato del sistema di iniezione (operanti in anello
chiuso o aperto ), stato di adattamento per il TPS (Keihin), posizione di memorizzazione su disco e il
nome della mappa caricata.
- Impostazione
dei parametri e accendere o spegnere i dispositivi come SLS, O ²
sensore, ecc:
Nota: Non tutti i parametri ei dispositivi in tutte le moto sono disponibili.
|
|
|
the table 0 or 1 (F or I), so you can access to the appropriate parameters.
The display "parameter" changes automatically depending on the chosen F or I map, to "parameter (Map 0)"
or "parameter (Map1)".
SAGEM –Selezionare una mappa:
<Menu>-File - Open Map File: selezionare una mappa da caricare dalla periferica di archiviazione.
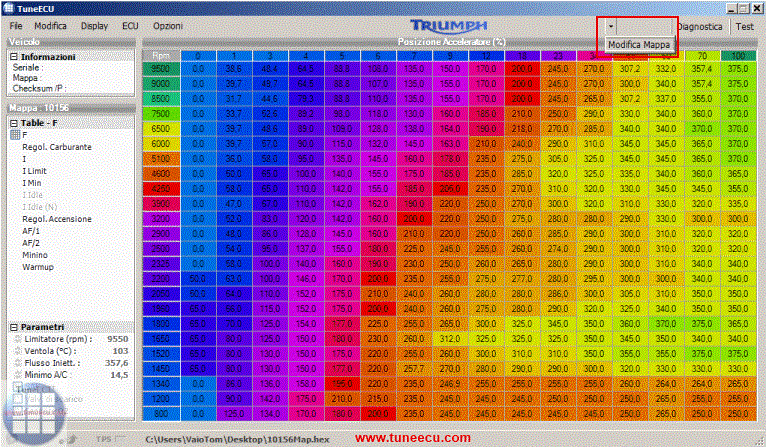
Fig.7a
Fig. 7a: (In alto a sinistra) Informazioni ECU: Numero di serie, identificativo della mappa, checksum e riprogrammazione dei parametri. Sono presenti varie tabelle che compongono la mappa (fare clic sul nome della tabella per selezionarla):
-
F: la tabella primaria di carburante (rappresentata in funzione del numero di giri - RPM - e della percentuale di apertura dell'acceleratore)
-
Fuel trim: Regolazione della quantità di carburante per la tabella "F" (%)
-
I: tabella relativa all'anticipo dell'accensione
-
I Limit: Limite di accensione
-
I Idle: accensione al minimo
-
I Idle (N): Tabella accensione in folle. La tabella viene utilizzata quando la moto è in folle.
-
Ignition trim: Regolazione della tabella di anticipo dell'accensione I (in °).
-
A/F1: Rapporto della miscela di aria/carburante (AFR) in funzione del carico motore (in %) e del numero di giri/motore.
-
A/F2: Rapporto della miscela di aria/carburante (AFR) in funzione del solo numero di giri/motore. La tabella A/F2 funziona allo stesso modo della tabella A/F1 quando il motore è a pieno carico. Pieno carico e acceleratore completamente aperto non sono la stessa cosa. La percentuale di carico è data dalla differenza fra la lettura della pressione nel collettore d'aria e della pressione atmosferica nell'airbox.
- ETV = Electronic
Throttle Valve:
The ETV tables are only tables for the gear ratio of the throttle grip to the stepper motor that moves
the throttle valves (0-100%).
These tables are for the different driving modes and they are also gear dependent.
For the following description, the map of a Triumph Street Triple 765 was used as an example.
Stepper value 0 in the ETV table = throttle valves closed.
Stepper value 1680 in the ETV table = throttle valves fully open (100%)
The stepper motor on this model has 1680 steps as a step to open the throttle valves 100%.
Means: 100/1680 = 0.058 .. - The stepper motor can vary the throttle position to approximately 0.06% accurate. -
Idling: regime del minimo in funzione della temperatura.
-
Warming-up phase: Rapporto della miscela di aria/carburante (AFR) in funzione della temperatura del motore.
Cambiamento dei valori e dei parametri delle tabelle (utente avanzato):
E'
sconsigliato fare modifiche ai valori che seguono, nel caso in cui la
mappa installata risulti già ottimizzata per l'installazione.
- F
- Fuel trim
- I
- I Limit
- I Idle
- I Idle (N)
- Ignition trim
Tuttavia,
se si dispone di un banco di prova dinamometrico, è sempre possibile
correggere i
valori per raggiungere migliori performance, sapendo che la
potenza maggiore è ottenuta con un valore AFR di 12,8
ed un consumo
inferiore per un valore AFR di 14,7.
Le altre tabelle possono invece essere modificate secondo le vostre preferenze: -
|
A/F1: |
Rapporto della miscela di aria/carburante (AFR) in funzione del carico motore (in %) e del numero di giri/motore. |
|
A/F2: |
Rapporto della miscela di aria/carburante (AFR) in relazione al numero di giri. La tabella A/F2 funziona allo stesso modo dlla A/F1 quando il motore è a pieno carico. Pieno carico e acceleratore completamente aperto non sono la stessa cosa. |
|
Idling: |
Regime di minimo in funzione della temperatura del motore. |
|
Warming-up
phase: |
Rapporto della miscela di aria/carburante (AFR) in funzione della temperatura del motore. |
Cambiamento dei valori e dei parametri di una
tabella (utente avanzato):
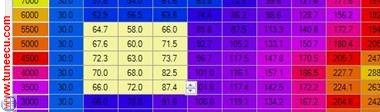
Fig.8
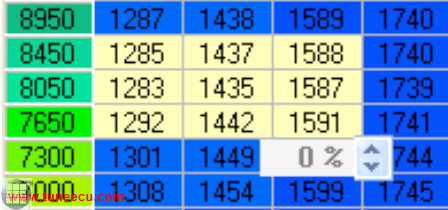
Valore interni alla tabella (Fig.8):
Selezionare
un valore interno ad una cella con un singolo click sulla cella, o
facendo una multi-selezione di
celle adiacenti tenendo premuto il tasto sinistro del mouse e
trascinando lungo le gelle da modificare. Aumentare/diminuire
il valore agendo sulle barre con le frecce sul display. Dalla versione
1.6 del programma è possibile
anche agire con variazioni percentuali del valore, premendo F4 per
alternare la modalità di variazione.
New
feature from release 1.6.1, You can select
individual or block or cells and adjust by %
Toggle F4 returns to incremental value mode . (Fig.8a)
Una anteprima del cambiamento che si sta per effettuare può essere visualizzato premendo e tenendo premuto il tasto F6.
New
feature from release 1.8
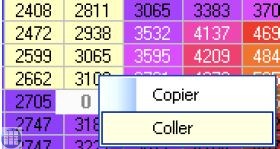
One or Multiple cell
can be copy/pasted, after selection – right click to access the
copy/paste menu.
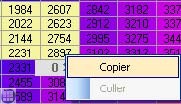
Select the first cell or multi select the value to be pasted and Right click.
 Note:
The values that have changed in the table, are shown in white color.
Note:
The values that have changed in the table, are shown in white color.
(Version
1.8.5)
Modification in graphical mode
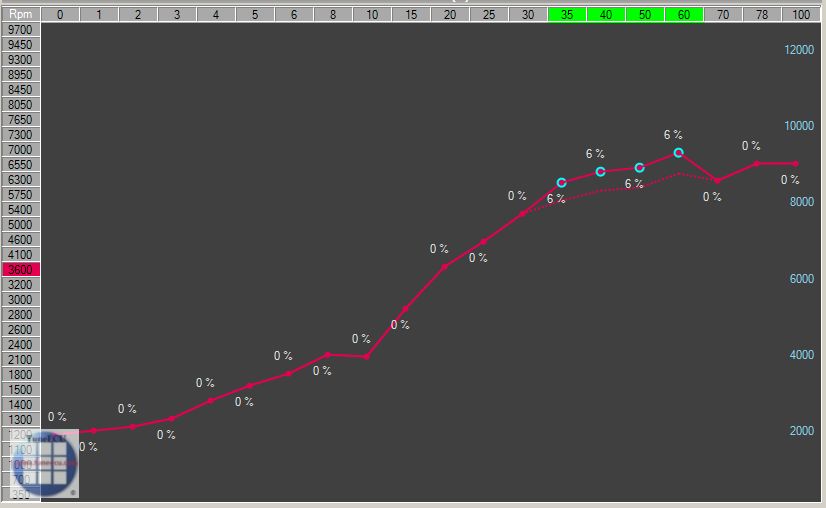
Select the rpm curve to
modify with a right click on a rpm axis
value, then select (or deselect) the TPS points to modify with a click
on a TPS axis value.
The selected points can be now move with the mouse.
Save
the modifications with a right click on an another rpm curve to modify
or with the 'Enter' key, press the 'ESC' key to quit the modification
mode without saving.
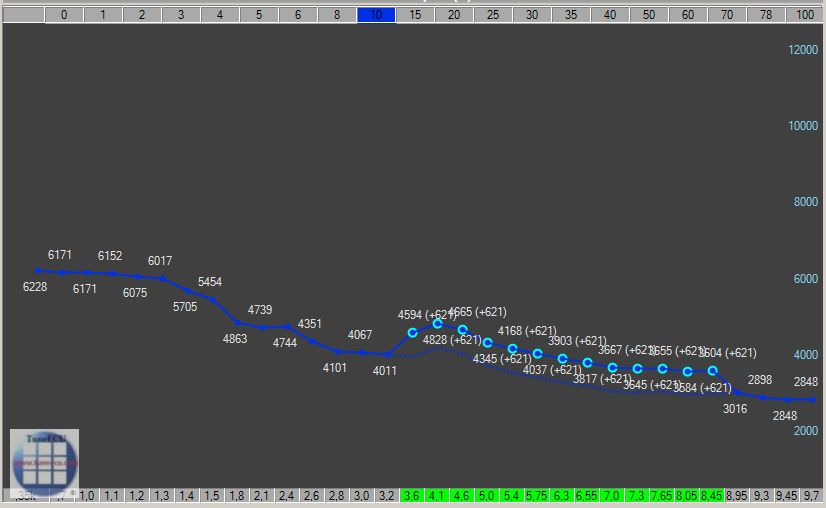
You can also modify a TPS
curve with a right click on a TPS axis
value, then select the rpm point to modify at the bottom of
the graph.
To select or deselect a area of points, click on the first value and
shift-click on the last.
The F curves can be move in % or absolutes values, the 'F4' key allow
you to toggle between this 2 modes.
By
holding the shift key pressed while you move the curve with the mouse
(or the wheel), the absolutes values are increased (or decreased) by
10. (values multiplied by 1000, eg 4.6 =
4600 rpm).
I parametri ei valori delle mappa:
Fare doppio clic sul parametro e
modificare sullo schermo con il mouse o tramite tastiera usando le
frecce su/giù.
Il
tasto ESC annulla le modifiche effettuate se premuto prima che i nuovi
valori vengano convalidati per
impostazione predefinita.
Una anteprima
del cambiamento che si sta per effettuare può essere visualizzato
premendo e
tenendo premuto il tasto F6.
Confronta con un'altra mappa
<Menu>
File-Compare File:
Scegliere un'altra mappa per il
confronto con la
mappa attualmente caricata.
Quindi premere il tasto
F6 per visualizzare i valori della mappa a confronto.
If you press the F6 key
again, you
return to the current
loaded map.
the other map (currently loaded map).
Il
confronto può essere anche visualizzato in modalità grafica (tasto F5
modalità-Display-vedi grafico sotto). La tabella in comparazione viene visualizzata
come tratteggiata.
Il
nome del file attualmente visualizzato viene mostrato nella barra di
stato.
Per
terminare il confronto, selezionare di nuovo il menu e deselezionare la
voce relativa al confronto.
Importazione
di una tabella PCIII (PowerCommander 3 / 5)
<Menu>
File-Import PC Table (.djm / pvm table):
Applies
*F-corrections* from a PCIII or a PC-V table in the "F-Trim"
table.
If available the Ignition table** will be imported into
the I Trim table.
* includes support of "cylinder
Advanced" feature, but not the "Gear Advanced", in this case
you must
choose the "Gear" table to
import.
** Only the first Ignition table will be imported.
For KTM User:
TuneECU follows the K?M convention, and commits the Trim 1 to F1 (F1 in
TuneECU = rear cylinder).
PowerCommander
not follows
the KTM convention, in the cyl.
selective PCIII- or PC-V map the table1
is the front cylinder.
You must change the values in the PCIII- or PC-V Map before you import
the cyl.
selective PCIII or PC-V map
with TuneECU.
For Sagem User:
Unfortunately,
there is a small problem, TuneECU can probably import
"cylinder-selective PC-Files" to a Sagem-map, but from these
"PC-Files", only
the first trim table in the main table (F-table) it is transferred.
This means that before importing such a PC file, this PC file from
"selective cylinder file" to "BASIC file"
must be converted. This conversion can be performed with the Power
Commander software.
Salvare la Mappa
Con la connessione
Bluetooth, le funzionalità di lettura e riprogrammazione della mappa
non sono disponibili per molti modelli. Le eccezioni sono nell'elenco
di compatibilità.
La mappa modificata può essere
salvata su disco:
<Menu>
File-Save Map File
Per
preservare la mappa inizialmente caricata ed evitare la sovrascrittura,
<MENU>
FILE SAVE e salvare come un diverso nome. Ricordatevi di aggiornare il testo
contenuto nella casella INFO MAPPA per descrivere la mappa aggiornata.
Uscire
dal programma
<Menu>FILE-
EXIT: Questa azione non è possibile se il download è in
corso.
<Menu> Modifica
 |
|
Display
<Menu>
DISPLAY-Graphic or (F5)
key :Alterna
un display grafico (Fig. 9) di ogni tabella.
Il
tasto F6 serve anche per confrontare due tabelle (vedi sopra) (premere F6 dopo aver selezionato una
tabella per
confrontare)
F7 key
shows the curves representing the values of the table for each opening
throttle.
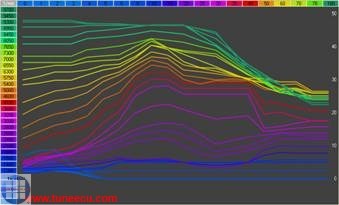
Fig.9
In questa modalità di visualizzazione (F5), selezionare e tenere premuto il tasto sinistro del mouse lungo valori adiacenti di velocità del motore (RPM). Verranno visualizzati solo gli intervalli corrispondenti della curva, insieme alla curva di pre-modifica o di una mappa di confronto caricata.
(F4 key) auto-display della curva
Premere F4 per attivare / disattivare la visualizzazione singola o multi-curve in base alla posizione del puntatore del mouse sulla colonna sinistra RPM.
Informazioni Mappa Display e Registri:
<Menu> Display-Map Infos:
Apre una finestra (modificabile) che permette di descrivere la mappa.
<Menu> Display-Logs:
Apre una finestra che visualizza il dialogo tra il software e l'ECU.
Collegamento con l' "ECU"
Se la connessione non avviene
automaticamente: <Menu> ECU-Connect
Storia (Sagem)
<Menu>
ECU-History
Consente di visualizzare una
finestra contenente il log per
l'ultima mappa ricaricata in ECU.
Visualizzare la Mappa
Leggi
Mappa
<Menu>
ECU-Read Map
Legge
e visualizza la mappa nella centralina per permetterne il backup (<Menu>
File-Save Map File).
Con la connessione
Bluetooth, le funzionalità di lettura e riprogrammazione della mappa
non sono disponibili per molti modelli. Le eccezioni sono nell'elenco
di compatibilità.
KEIHIN: Questo
processo può durare 20 minuti, quindi è essenziale rimuovere il
fusibile delle le luci, o collegare un caricatore per la batteria,
meglio ancora una seconda batteria da 12 volt da una macchina..
Nb. Su
alcune moto, eliminando i fusibili per disabilitare le luci, non sarà
possibile avviare la moto.
Al primo caricamento di una mappa simile (mappa base), il tempo di caricamento potrebbe essere significativamente ridotto.
Come è indicato tra parentesi (Fig. 10), la mappa base in questo esempio è la 20152.
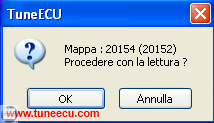
Fig.10
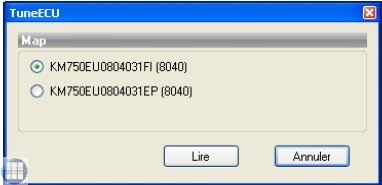
Fig. 10a
FI
is a acronym for EFI
= Electronic Fuel Injection
EP is a acronym for EPT = Electronic
Power
Throttle
Lo stato di avanzamento del download viene visualizzato nella barra di stato. (Fig. 11).
L'operazione può essere interrotta cliccando sul pulsante Chiudi finestra.
![]()
Fig.11
Attention!!
For KTM 690 models, order of operations note:
With
Bluetooth connection, the map reading and reprogramming functions are
not available
for many models. Exceptions are in the compatibility
list.
- Flashing the
EP-map, after the flashing of the EP-map, turn off
ignition, wait about 10 seconds
and switch on the ignition again, slowly rotate the Throttle until full throttle then slowly close the throttle,
turn off the ignition.
- Only now flashing the FI map, after data transfer is a reset the adaptation required.
Riprogrammazione della ECU
(Tuneecu versione di Windows, ovvero "Download" dal PC alla ECU)
Con la connessione
Bluetooth, le funzionalità di lettura e riprogrammazione della mappa
non sono disponibili per molti modelli. Le eccezioni sono nell'elenco
di compatibilità.
Your battery must be fully charged before doing any mapping work -- ideally connected to a battery tender, better yet a second 12 volt battery from a car.
<Menu>-ECU Download oppure fare clic sul pulsante verde "Download" (Fig. 7a) nell'angolo in alto a destra,
(L'icona “Map Edit” diventa verde e cambia in “Download” quando il software è pronto a inviare la mappa alla "ECU"). Questa azione richiede conferma prima di essere eseguita.
Riprogrammazione della ECU (Con TuneECU per Android):
Versione Android con connessione via cavo:
- start TuneECU
- allow the application to use the FTDI cable
- In the "ECU" menu, use the "Select" option to select the type of ECU (for example, Triumph Keihin).
- Turn on the ignition.
- In
the "ECU" menu, select the "Connect" option and wait for the flashing
red status light on the bottom
right to start flashing green. - open in the "map" menu the desired map
- In the ECU menu, select the "Reprogramming" option.
Versione Android con connessione Bluetooth:
Note:
With the Bluetooth connection (only possible with the Android version),
the ECU card reading function is not available and the Reprogramming
via Bluetooth function is only available for models indicated by the
programmer in the list of bikes.
- start TuneECU
- Turn on the ignition.
- When you start TuneECU for the first time, select the Bluetooth adapter to use. During a subsequent
start, all that remains is to confirm whether the application is authorized to activate Bluetooth. - In the "ECU" menu, use the "Select" option to select the type of ECU (eg, Triumph Keihin).
- Select "Connect" in the "ECU" menu
- When using a compatible Bluetooth adapter, the indicator flashes blue, then red and yellow when establishing the connection. When the connection is established, the indicator flashes green.
- In the map window, open the desired map via the "Map" menu.
- In the "ECU" menu, select the "Reprogramming" option.
For these models, special Bluetooth adapters such as OBDLink LX or OBDLink MX are required,
the other adapters do not work. It is not possible to read the befidlichen on the ECU card with Bluetooth.
Attention! For KTM 690: The FI and EP mapping must match on a KTM 690.
For
the KTM 690 both maps are always required (FI and EP-Map)
Attention!!
For KTM 690 models, order of operations note:
With
Bluetooth connection, the map reading and reprogramming functions are
not available
for many models. Exceptions are in the compatibility
list.
- Flashing the
EP-map, after the flashing of the EP-map, turn off
ignition, wait about 10 seconds
and switch on the ignition again, slowly rotate the Throttle until full throttle then slowly close the throttle,
turn off the ignition.
- Only now flashing the FI map, after data transfer is a reset the adaptation required.
Walbro ECU (Benelli TNT, Tornado 130 & TREK):
Nota: versione di Android, esclusivamente con FTDI cavo convertitore USB/RS232
Follow
strictly
the instructions on the screen to keep it the 2-pin connector ready and
connect this,
when the program tells you to.
Viene
effettuata una verifica
della compatibilità tra la centralina e la mappatura. Lo
stato di avanzamento
del download viene visualizzato nella barra di
stato (Fig.
11).
Al
termine del download, viene visualizzato un messaggio che conferma che
il trasferimento è stato
completato con successo.
ATTENTION!
Walbro ECU:
Remove the 2-pin connector before turning
off the
ignition.
Se
il download non riesce (Fig.
12):-
1. fare clic su OK senza scollegare il cavo di interfaccia.
2. Spegnere il motore e permettere l'arresto dell'ECU (attendere fino a 30 sec)
3. Accendere il quadro.
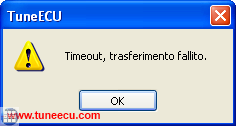
Fig.12
<Menu>
ECU-Recovery
della ECU (Sagem & Keihin).
Con la connessione
Bluetooth, le funzionalità di lettura e riprogrammazione della mappa
non sono disponibili per molti modelli. Le eccezioni sono nell'elenco
di compatibilità.
Note:
For this process, in TuneECU must a suitable map to be open, at the
best an OEM map.
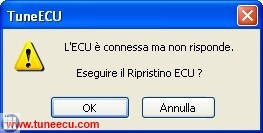
Fig.13
Al
termine del download, viene visualizzato un messaggio che conferma che
il trasferimento è stato completato con successo. (Fig.
14)
ATTENTION!
Walbro ECU:
Remove the 2-pin connector before turning
off the
ignition.
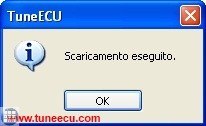
Fig.14
Recovery of the Walbro ECU models (TuneECU windows vers):
Nota: versione di
Android, esclusivamente con FTDI cavo convertitore USB/RS232
- Wait
for the message "ECU not responding ..." and select Cancel
- Select menu "ECU" <Recovery>
- Always
follow the instructions on
the screen.
On the
final process,
the final message "ECU
fully restored"
Confirm by clicking "OK"
The following changes apply to the Android version
of TuneECU and Walbro ECU
Recovery of the Walbro ECU models via Android_Vers.:
- Menu "ECU" <Select> Benelli 899/1130 (This item appears only if you have a USB cableplugged on the android device)
- Menu "ECU" <Connect>
- Wait for the (first) message "ECU is not responding ..." and select OK
- Select menu "ECU" <Reprogram>
- Follow the instructions on the screen.
(of course you must be in the Map screen with a Map for your bike opened)
Reset di
adattamento Keihin
ECU Triumph
<Menu> ECU Reset di adattamento
Dopo aver caricato una mappa (Fig.
12), è necessario un reset del adattamento.
1. Turn the ignition off and back on again.
2. Wait 10 seconds and turn the ignition off again.
3. Turn the ignition on. Wait until TuneECU has connected automatically and
select "Reset di adattamento"
from the ECU menu.
4. Quindi avviare il motore e lasciarlo al minimo senza accelerare fino
a quando l'indicatore "status TPS"
(nella barra di stato) diventa verde
(dopo
circa 15-20 minuti).
Reset di adattamento, solo Triumph Sagem lambda sensori modelli
The manufacturer of Triumph motorcycles describes this process as follows:Fuel System
Adaption — e.g. Daytona 955i, Sprint ST,
Sprint RS, Tiger, TT600 and Speed Triple
(only Sagem models with Lambda)
The fuel system fitted to the above
models is adaptive. This
means that the engine management system will
self-adjust air fuel ratio (i.e.
the mixture setting) to its optimum level in order to ensure differing
running
conditions do not result in poor running.
During an adaption, the engine
management system examines
the air--fuel ratio as measured by the oxygen sensor in the exhaust
system and,
if necessary, makes an adjustment. In some cases, a single adaption may
be
sufficient but in others, more adaptions will be necessary.
An adaption take place when all the
following conditions are
met:
- Gearbox in neutral, clutch engaged.
- Coolant temperature 80 -- 100 °C
- Airbox temperature 21°C minimum
- Engine idling for 10 -- 30 seconds
Once adaption has taken place, the
settings are retained
ensuring that adaption is not necessary every time
the engine is started.
Particularly for new bikes, where the
engine has not been
run-in, it may be necessary for dealers to ensure adaption has taken
place
before handing the motorcycle over to the customer. This can, of
course, apply
at
any other times as well.
takes place automatically.
Blip the throttle every 30 seconds to start another adaption cycle.
When
coolant or
airbox temperatures are above or below adaption thresholds, allow
the engine to cool or warm-up before
continuing.
To check that adaption has been
completed, scroll the
Triumph diagnostic tool to DIAGNOSTICS--CURRENT
DATA--LAMBDA FUEL. in a correctly adapted bike, the lambda
fuel reading should show 0.0% (though
operators should note that the figure
will continue to change during engine operation but will settle at 0%
briefly
but regularly.
If reading higher than +3% or --3%
are seen continuously,
adaption is necessary and can be brought about
in the conditions mentioned
earlier (remembering that more than one adaption will be needed on
occasions).
If a stationary LAMBDA FUEL figure of
--19.6% is seen, download the correct tune for
the model in question
and begin the adaption process as described.
Finally, use of the SET LONG TERM
FUEL TRIM adjustment in
the Triumph diagnostic tool should be reserved
solely for when replacement ECMs
are newly fitted (or are transferred from another bike).
In clarification, the following described process should be not so correct.
1. Ensure bike is seeing a closed throttle position (CTP),
if not, then perform TPS reset.
2. Bike in Neutral
3. Coolant temperature between 80-96°C
4. Minimum air box temperature of 21°C
5. Now with clutch pulled, blip the throttle to 3000 RPM and let it drop back to idle for at least 30 seconds,
all with the clutch lever pulled in.
Check bike is adapted by viewing Lambda Fuel.
Figures should be "toggling" +4 to -4
Don't forgot to check IACV steps are 20 - 35
Reset TPS, tutto Sagem ECU's -Triumph,
Benelli & Aprilia- (Riporta la
posizione della farfalla alla
posizione zero)
- Quadro e interruttore del motore accesi, ma motore spento.
- Fare doppio clic sul pulsante Ripristina TPS.
- La posizione della valvola a farfalla viene impostata a zero per un tempo abbastanza elevato.
- Avviare il motore e lasciarlo al minimo abbastanza a lungo da consentire alla centralina di allinearsi al valore di giri/min desiderato per il minimo desiderato e impostato (60 secondi)
Reset di adattamento e / o inizializzazione conduzione - Keihin ECU - solo K?M
Dopo aver scaricato (FI-map), avviare il motore e al minimo (senza toccare acceleratore) per 15 minuti, poi spegnerlo.
990cc
models SD, SM, & Adventure:
After download from an new map, you must perform an
initialization run.
The 990s must be on the center stand, and are thus stand vertically.
For SD / SM models use a Paddock-
Stands or the side stand with a piece of wood underneath.
The engine must be cold.
There should be the coolest possible air temperature outside, this can
be very helpful for a lower fuel
consumption. Start the engine and let it run at idle for 15 minutes.
During these 15 minutes, not use the
throttle or any other functions.
The 15 minutes need to be strictly adhered to, and must not fall below.
The time can only be exceeded by
a maximum of one minute.
Should the engine go out, then re-start ONLY, do not begin 15 minutes
again. (Source: German K?M Forum)
If you want to perform an
initialization run only, you must first reset in any case the
adaptation.
(Source: LC8 German K?M Forum)
New in TuneECU version 2.3.5 for K?M 990 & 1190
Reset
ECU after replacing or repairing the engine.
CAUTION: To
adapt the ECU to the change of parameters after replacement or repair
with
the replacement of the engine pistons, cylinders or cylinder
heads, a reset of the ECU must be performed.
If you omit this step,
the engine can have a dysfunction at idle for a long period.
- Connect the diagnostic cable, run the program and turn ignition ON.
- Wait until connection is established.
- Go to the tab "Tests" and double-click "Reset Adaptation".
- Wait for the message "Reset Adaptation done", exit the program and
disconnect the diagnostic cable.
- Run the engine at idle for 15 minutes without touching the throttle,
check the coolant temperature, stop the
engine in case of overheating.
After downloading a FI-map, start the engine and let runnig it idle (without touching accelerator)
for 15 minutes, then turn it off.
After downloading a EP-map, Following a mapping download into the ECU, turn off the ignition (key),
turn on the ignition, slowly rotate the Throttle until full throttle then slowly close the throttle, turn off the ignition.
Reset TPS Benelli Walbro ECU (TNT, Tornado 1130 and TREK models)
Nota: versione di
Android, esclusivamente con FTDI cavo convertitore USB/RS232.
In testing mode, double-click "Reset TPS"
Cancella Codici
Errore
<Menu> Cancella
Codici Errore
In "Diagnostica" o in modalità
test, questo comando cancellerà i codici di errore e i messaggi
memorizzati dalla centralina. Se
i problemi che hanno causato questi codici di errore non sono stati
risolti (es. sensore difettoso), i codici di errore saranno
nuovamente generata e memorizzati nella centralina.
Opzioni
<Menu>
Opzioni- Connetti Automaticamente.
Se
questa opzione è selezionata e il cavo collegato, il programma si
connetterà automaticamente alla centralina e si avvierà in modalità di
funzionamento di default.
<Menu>
Opzioni-Interfaccia
Mostra
quale interfaccia viene utilizzata per connettersi alla centralina,
collegare solo un cavo ad una sola interfaccia.
Attention
New in version 2.3! Select the correct
interface, for Keihin and Sagem select "USB"
and for Walbro select "Serial"- and then the
correct COM port.
<Menu>
Opzioni- Linguaggio
Selezionare
la lingua preferita (inglese, francese, tedesco o italiano) per il
programma. Di default il
software utilizza la lingua del sistema operativo.
Tutte
le attenzioni del caso sono state prese nella creazione di questa
pagina,
tuttavia l'autore non garantisce la completezza e l'accuratezza delle
informazioni riportate.
***
FINE ***