
Edición
de mapas
Esta descripción fue creada para la versión de Windows de TuneECU y puede aplicarse en gran medidaen la versión de Android.
Video de aprendizaje en You Tube en inglés.
La
primera vez que
se escoja la opción de edición de mapas TuneECU pedirá un archivo de
mapa
(extensión hex) o leerlo directamente de la centralita del vehículo. La
segunda
y siguientes veces que se ejecute el programa se abrirá por defecto con
el
último mapa utilizado.
Deberás
seleccionar
un mapa que coincida con el modelo y configuración de tu vehículo (ej.
tipo de
silencioso)
<MENU> Pantalla- Mapa Infos
Cuando selecciones
un mapa (fig.6), los parámetros del mapa (como modelo de moto)
aparecerán y
podrán
ser editados (texto editable) y
guardados como parte de un mapa (.hex).
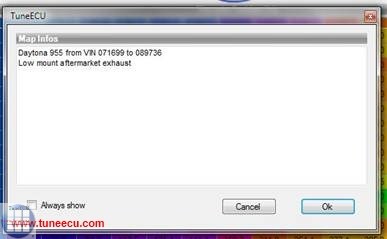
Fig.
6
KEIHIN
- Select a Map:-
<Menú>-Archivo -
Abrir Mapa: y
selecciona un mapa adecuado.
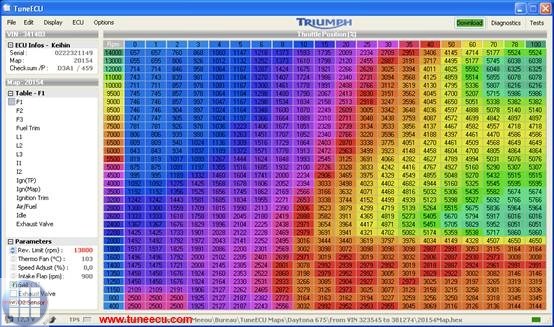
Fig.7
Fig 7:
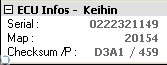
(arriba
izquierda) información
de ECU: Número de
serie, ID de mapa, suma de chequeo y medidor
de reprogramación.
|
|
Número de serie, ID de mapa, suma de chequeo y medidor de reprogramación. Click in this field to see information from the second ECU (K?M 690). |
Aquí algunos detalles
que forman un mapa (click para seleccionar):
F1-4: Corrección de
combustible: las tablas principales de combustible para los cilindros 1
a 4 (RPM
y
posición del acelerador
% abierto). or F3-1
corresponding to the position of the mapping switch
on the K?M 690.
L1-4: tablas de
combustible para aperturas bajas del acelerador (RPM y carga del motor,
derivadas de
la presión de
aire en el colector de admisión).
Estas tablas se
utilizan en vez de las tablas principales a las posiciones del
acelerador de baja.
Estas tablas están
indexadas por la presión de aire en el colector de admisión. L3-1
for K?M 690
I1-4: las tablas del
avance del encendido.
Corrección de
encendido: Corrección de las tablas de encendido (grados °).
I3-1 and I-LOF
(Low
Octane Fuel) for K?M690
I-Tables Daytona 675, at these model, are the I-tables
depending on the selected gear.
I (1st) = 1. gear,
I (2 - 5th) = 2. - 5. gear, I (6th) = 6. gear and I (N) = Neutral
ETV = Electronic
Throttle Valve:
The
ETV tables are only tables for the gear ratio of the
throttle grip to the stepper motor that moves
the throttle valves
(0-100%).
These tables are for the different driving modes (e.g. Rain, Tour and Race) for the ETV models e.g.
from Triumph, there are further tables for each selected driving mode, which operate depending on
the gear selected.
For the following
description, the map of a Triumph Street Triple 765 was used as an
example.
Stepper value
0 in the ETV table =
throttle valves closed.
Stepper value 1680 in the ETV table =
throttle valves fully open (100%)
The
stepper motor on this model has 1680 steps as a step to open the
throttle valves 100%.
Means:
100/1680 = 0.058 .. - The stepper motor can vary the throttle position
to approximately 0.06% accurate.
For Benelli models: TnT
Sports, TNT CR, TreK1130, TnT standard (05/06) and TNT R160.
For the models, TnT Sport , TnT CR, and
TnT TreK1130 standard (05/06), Map1 (I & F)
the maps is for reduced fuel consumption = reduced performance. Map0 (I
& F) is for open
performance and maximum torque.
For the TNT R160,
Map1(I & F) is for use with DB-killer, and Map0 the map is for
operating
WITHOUT DB-Killer, Map0 (I & F) is not suitable for
use with DB killer. (Source http://www.benelli-info.de)
Aire/Combustible:
índice de mezcla de aire/combustible (ACR)
Ralentí: velocidad
de ralentí en función de la temperatura.
Válvula de escape
(Daytona 675): la posición de la válvula de escape (lengüeta/rpm)
Válvulas de mariposa
secundarias (Daytona 600, 650, Rocket III & K?M):
la posición de las
válvulas de
las mariposas
secundarias/rpm e índice de
velocidades (cambio).
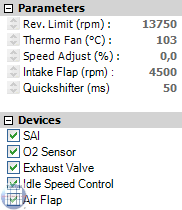
Los parámetros de un mapa:
Limitador de RPM, temperatura del electro ventilador, margen de error del velocímetro (rango de 0% a -6%),
Limitación de velocidad (Rocket III), Air Flap & Exhaust Valve Daytona 675, cutoff time Quick Shifter
(Daytona675 from model 2009), índice de flujo del inyector e índice A/F (Sagem).
La barra de estado indica la tensión de la batería, el estado del sistema de inyección (si opera en bucle
abierto o cerrado), estado de adaptación del TPS (Keihin), ruta y nombre local del mapa en uso.
Setting parameters and switch on or
off the devices such as SLS, O² sensor, etc.:
Note: There not any parameters and devices in all bikes are available.
|
|
Double-click the desired parameter and change it according to your wishes. Use the Esc key to undo the changes to make. Otherwise, the new values will be automatically used as default values. The revised map must be saved in spite of this and can then be uploaded to the ECU. For turning on or off a device (eg, the SAI) with the left mouse button on the Device make a double-click or click the device with the right mouse button and select "Enable" or "Disable". Caution: Do not disable the secondary butterflies (K?M) only if the butterflies or the secondary system (motor PAP and second GST (TPS) ) are removed. |
The parameters for the two Benelli 1130 Map's
(Map 0 and Map 1) can be changed separately,
select the table 0 or 1 (F or I), so you can access to the appropriate
parameters.
The display "parameter" changes automatically depending on the chosen F
or I map,
to "parameter (Map 0)" or "parameter (Map1)".
SAGEM – Selección de
un mapa:
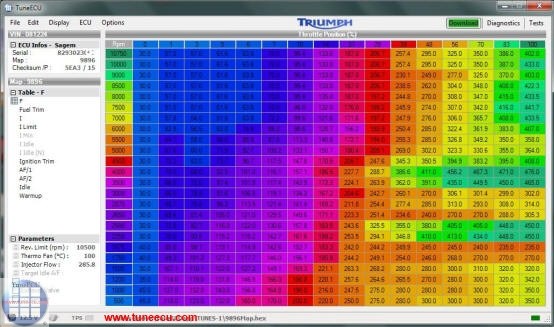
Fig.7a
Fig 7a: (arriba izquierda) información de ECU: Número de serie, ID de mapa, suma de chequeo y medidor de reprogramación.
Aquí algunos detalles
que forman un mapa (click para seleccionar):
-
F: la tabla principal del combustible (RPM y posición del acelerador %).
-
Corrección de combustible: Corrección de las tablas de combustible F (%)
- E: tablas del avance del encendido.
- E Límite: Límite del encendido.
- E Ralentí: encendido en reposo
- E Ralentí (N):
.Valor de encendido en
posición (N) - La tabla que se utiliza cuando la
motocicleta está en Neutro.
- Corrección encendido: Corrección del avance del encendido (en °).
-
A/F1: Ratio de aire/combustible basado en carga del motor (en %) vs RPM.
-
A/F2: Ratio de aire/combustible basado en RPM. Esta tabla funciona igual a A/F1 cuando el motor
está a plena capacidad (rendimiento). Plena capacidad y tope de aceleración no son lo mismo.
La capacidad (%) está derivada de la diferencia de presión del colector de entrada de aire y la
presión atmosférica (desde la caja del aire). -
A ralentí: ralentí según la temperatura ambiente
-
Fase de calentamiento: Mezcla de aire/combustible dependiendo de la temperatura del motor
-
-
No se recomienda cambiar los valores de los siguientes parámetros ya que el mapa instalado es el óptimo para su funcionamiento..
- F
- Corrección de combustible
- E
- E Límite
- E Ralentí
- E Ralentí (N)
- Corrección encendido
Sin embargo, si
dispones de un banco de potencia (dinamómetro) es posible ajustar los
valores
para obtener un mejor rendimiento, sabiendo que la potencia óptima se
obtiene
con un valor AFR (ratio aire/combustible) de entre 12.8 y 14.7 para un
consumo
óptimo.
Las demás tablas
pueden ser modificadas según preferencias personales.
|
A/F1: |
Relación de aire/combustible entorno al índice de carga del motor (en %) a las rpm. |
|
A/F2: |
Mezcla de Aire/Combustible en relación a las RPM. La tabla A/F 2 funciona igual a la tabla A/F 1 cuando el motor está a pleno rendimiento. Pleno rendimiento y gas a fondo no es lo mismo |
|
A
ralentí: |
Velocidad de ralentí dependiendo de la temperatura del motor |
|
Fase
de calentamiento: |
Mezcla de gasolina/aire dependiendo de la temperatura del motor. |
Cambiar
los valores
y parámetros de una tabla (usuario avanzado):
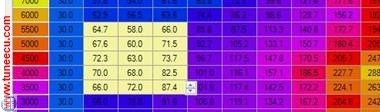
Fig.8
Valores
de una tabla
(Fig.8):
Selecciona
una
celda/casilla con un solo click o
varias
celdas haciendo click en una y manteniendo pulsado el botón del mouse y
hacer
una selección de las adyacentes.
Incrementa
o disminuye los valores con el mouse con las flechas (Fig. 8a)
Nueva actualización
a partir de la versión 1.6.1, puedes seleccionar celdas individuales o
bloques
y ajustar el porcentaje. Con la tecla F4 cambias a valores numéricos o
valores
de porcentaje.
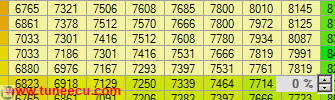
Fig.8a
Los valores anteriores al cambio pueden ser visualizados pulsando la tecla F6.
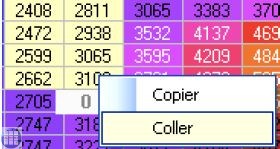
New
feature from release 1.8
One or Multiple cell
can be copy/pasted, after selection – right click to access the
copy/paste menu.
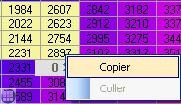
Select the first cell or multi select the value to be pasted and Right click.
 Note:
The values that have changed in the table, are shown in white color.
Note:
The values that have changed in the table, are shown in white color.
(Version
1.8.5)
Modification in graphical mode
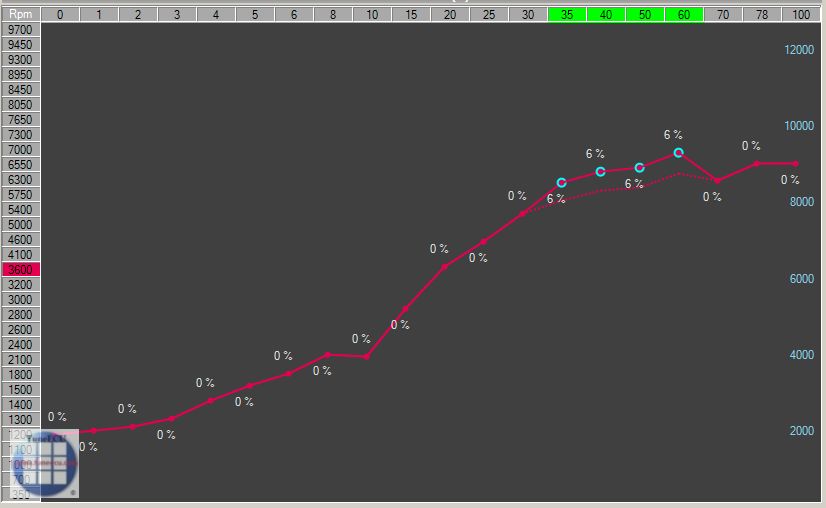
Select
the rpm curve to modify with a right click on a rpm axis
value, then select (or deselect) the TPS points to modify with a click
on a TPS axis value.
The selected points can be now move with the mouse.
Save
the modifications with a right click on an another rpm curve to modify
or with the 'Enter' key, press the 'ESC' key to quit the modification
mode without saving.

You
can also modify a TPS curve with a right click on a TPS axis
value, then select the rpm point to modify at the bottom of
the graph.
To select or deselect a area of points, click on the first value and
shift-click on the last.
The F curves can be move in % or absolutes values, the 'F4' key allow
you to toggle between this 2 modes.
By
holding the shift key pressed while you move the curve with the mouse
(or the wheel), the absolutes values are increased (or decreased) by
10. (values multiplied by 1000, eg 4.6 =
4600 rpm).
Paremetros (valores) del mapa:
Haz doble
click
sobre el parámetro y se podrán cambiar los valores con el mouse o con
las
flechas arriba/abajo.
La
tecla ESC cancela
los cambios y los devuelve a los valores establecidos por defecto.
Comparar con otro
mapa
<Menu>
Archivo
– Comparar Mapa:
Selecciona
otro mapa
para poder compararlo con el mapa actualmente en uso.
Select
a different map for comparison. Pressing the <F6> key to
view the values.
If you press the F6 key
again, you
return to the current
loaded map.
The compared map that was opened to
compare the values, you can copy values and then paste in
the other map (currently loaded map).
El
archivo/mapa
actualmente en uso es aquel reflejado en la barra de estado (ruta del
archivo)
Para salir de la
comparación, selecciona el mismo menú y escoge 'CANCELAR' en la ventana
de
selección de archivo.
Importing a PCIII or PC-V table (PowerCommander 3 or 5)
<Menu> File-Import PC Table (.djm table or .pvm table):
Applies *F-corrections* from a PCIII or a PC-V table in the "F-Trim" table.
If available the Ignition table** will be imported into the I Trim table.
* includes support of "cylinder Advanced" feature, but not the "Gear Advanced", in this case you must
choose the "Gear" table to import.
** Only the first Ignition table will be imported.
For KTM User:
TuneECU follows the KTM convention, and commits the Trim 1 to F1 (F1 in TuneECU = rear cylinder).
PowerCommander not follows the KTM convention, in the cyl. selective PCIII- or PC-V map the table1
is the front cylinder.
You must change the values in the PCIII- or PC-V Map before you import the cyl. selective PCIII or PC-V map
with TuneECU.
For Sagem User:
Unfortunately, there is a small problem, TuneECU can probably import "cylinder-selective PC-Files" to a Sagem-map, but from these "PC-Files", only the first trim table in the main table (F-table) it is transferred.
This means that before importing such a PC file, this PC file from "selective cylinder file" to "BASIC file"
must be converted. This conversion can be performed with the Power Commander software.
Guardando el Mapa (Solo es posible con conexión de cable.)
El
mapa modificado
puede ser guardado al disco local:
<Menú>
Archivo-Guardar
Mapa
Nota: Para preservar
el archivo original guárdese el archivo con otro nombre. Recuerda
actualizar la
información/notas del mapa en el cuadro de texto
para dicha función.
<Menú>
ARCHIVO
- SALIR: Esta acción no es posible si está en
proceso una descarga de mapa.
Editar
<Menú>
EDITAR
 |
|
Pantalla
<Menú> PANTALLA
- Grafico o tecla (F5): cambia el modo de visualización en
los entornos
gráficos
(Fig. 9) de cada tabla.
Véase también COMPARAR
arriba (pulsa F6 después
de seleccionar una tabla para su comparación)
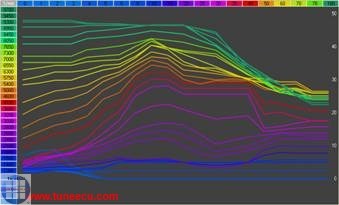
Fig.9
En este
modo de
visualización (F5),
selecciona con el botón izquierdo del ratón por los valores
adyacentes de las RPM. Sólo la(s) curva(s) de los rangos será(n)
visualizado(s)
junto con otra(s) curva(s) de pre modificación o de otro mapa a modo de
comparación.
Pulsando F4 cambia
el modo de visualización entre la curva simple o curvas múltiples
mientras el
cursor del ratón es arrastrado por la columna de las RPM.
El
nombre de archivo
actualmente en uso en la barra de estado.
Apretando F6 te permite ver la tabla actualmente en uso antes de su modificación o el archivo de mapa para su comparación…
Visualizar
Información y Registros:
<Menú> Pantalla
– Información de Mapa:
Abre
una ventana
(con información editable) de la descripción del mapa.
Abre
una ventana con
un resumen de las comunicaciones entre el programa y la ECU.
Conectar con la ECU
Si
la conexión no se
realiza de manera automática: <Menú>
ECU - Conectar
Historial (Sagem)
<Menu> ECU
–
Historial
Muestra una ventana
con los registros del último mapa descargado a la ECU.
Ver el
mapa
<Menu> ECU –
Leer mapa
Con la conexión Bluetooth, las funciones de lectura de mapas y reprogramación no están
disponibles para muchos modelos. Las excepciones están en la lista de compatibilidad.
Lee
y muestra el
mapa de la ECU para una posible copia de seguridad. (<Menú> Archivo –
Guardar mapa).
KEIHIN: Este
proceso puede tardar 20 minutos, por ello es esencial que las luces
estén apagadas
(quitar el fusible de las mismas) o que la batería esté
conectada a un cargador, better yet a second
12 volt battery from a
car.
Nota: En algunos modelos quitar los fusibles de las luces
puede
ocasionar que la moto no arranque.
Si se
descarga un
mapa similar (a partir de un mapa base), el tiempo de descarga se verá
reducido.
En este ejemplo
(fig.10), el número de mapa base viene indicado entre paréntesis
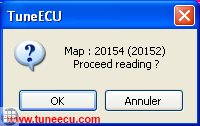
Fig.10
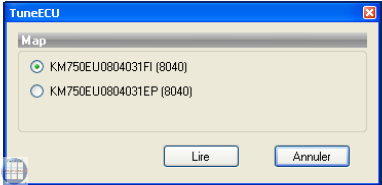
Fig. 10a
( FI or FI). Fig.10a
For the KTM 690 both cards are always required (FI and EP-Map)
FI
is a acronym for EFI
= Electronic Fuel Injection
EP is a acronym for EPT = Electronic
Power
Throttle
La operación puede ser cancelada haciendo click en la ventana emergente en el botón 'Cerrar'
El mapa deberá estar guardado antes de poder descargarlo a la ECU.
![]()
Fig.11
For KTM690 models, order of operations note:
First flashing the EP-map, after the flashing of the EP-map, turn off ignition, wait about 10 seconds
and switch on the ignition again, slowly rotate the Throttle until full throttle then slowly close the throttle,
turn off the ignition.
Only now flashing the FI map, after data transfer is a reset the adaptation required.
Reprogramación de la
ECU (con TuneECU para Windows, Descargar del PC a la ECU)
Con la conexión Bluetooth, las funciones de lectura de mapas y reprogramación no están
disponibles para muchos modelos. Las excepciones están en la lista de compatibilidad.
Reprogramación de la ECU (con TuneECU para Android):
Versión de Android con conexión por cable:
- Inicie TuneECU
- Permita que la aplicación use el cable FTDI
- En el menú "ECU", use la opción "Seleccionar" para seleccionar el tipo de ECU (por ejemplo,
Triumph Keihin). - Encienda el encendido.
- En el menú "ECU", seleccione la opción "Conectar" y espere a que la luz roja parpadeante
de estado en la parte inferior derecha comience a parpadear en verde. - Abra en el menú "mapa" el mapa deseado
- En el menú de la ECU, seleccione la opción "Reprogramación".
Nota: Con la conexión Bluetooth (solo es posible con la versión de Android), la función de lectura de la
tarjeta ECU no está disponible y la función Reprogramación a través de Bluetooth solo está disponible
para los modelos indicados por el programador en la compatibilidad lista.
- Inicie TuneECU
- Encienda el encendido.
- Cuando inicie TuneECU por primera vez, seleccione el adaptador Bluetooth para usar. Durante un inicio posterior, todo lo que queda es confirmar si la aplicación está autorizada para activar Bluetooth.
- En el menú "ECU", use la opción "Seleccionar" para seleccionar el tipo de ECU (por ejemplo,
Triumph Keihin). - En el menú "ECU", seleccione la opción "Conectar"
- Cuando se utiliza un adaptador Bluetooth compatible, el indicador parpadea en azul, luego en rojo
y luego en amarillo durante la conexión. Cuando se establece la conexión, el indicador parpadea
en verde. - Abra en el menú "mapa" el mapa deseado
- En el menú de la ECU, seleccione la opción "Reprogramación".
de bicicletas. Para estos modelos, se requieren adaptadores Bluetooth especiales como "OBDLink LX"
u "OBDLink MX" u "OBDLink MX+", otros adaptadores no funcionan. No es posible leer el befidlichen en
la tarjeta ECU con Bluetooth.
Your
battery must be fully charged before doing any mapping work -- ideally
connected to a battery tender, better yet a second 12 volt battery from
a car.
<Menú> - ECU -
Descarga o haz click en el botón verde
"Descarga" (Fig. 7a) de la
esquina arriba-derecha,
(“Edición Mapa” permite cambiar a verde el botón de “Descarga” indicando que está listo para enviar a la ECU).
Attention! For K?M 690: The FI and EP mapping must match on a K?M 690.
For
the K?M 690 both cards are always required (FI and EP-Map)
Nota: utilizar la versión de Android, exclusivamente con FTDI convertidor USB cable/RS232
Follow strictly
the instructions on the screen to keep it the 2-pin connector ready and
connect this, when the program tells you to.
Se realizará una verificación de la compatibilidad entre la ECU y el mapa. El progreso de la descarga (actualización) será indicado en la barra de estado (Fig. 11).
Al
final de la
descarga, una ventana emergente te indicará si ha sido satisfactoria la
descarga del mapa.
ATTENTION!
Walbro ECU:
Remove the 2-pin connector before turning
off the
ignition.
Si la
descarga no se
completara (Fig. 12):-
1. haz
click en OK
sin desconectar la interfaz (cable)
2. Gira la llave de contacto en posición 'OFF' y espera a que TuneECU se cierre (hasta 30 segundos)
3. Gira la llave en posición "ON"
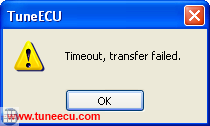
Fig.12
Si el botón de
"Descarga" se vuelve de color verde, vuelve a intentar la descarga,
si no espera a que TuneECU te pida para hacer una recuperación de la
ECU(Fig.
11), o hazlo según las instrucciones siguientes :
<Menu> ECU –
Recuperación
de la ECU (Sagem & Keihin).
La conexión Bluetooth no está disponible para muchos modelos.
Las excepciones están en la lista de compatibilidad.
Note: For this
process, in TuneECU must a suitable map to be open, at the best an OEM
map.
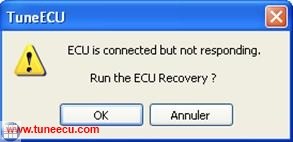
Fig.13
Al
final de la
descarga, una ventana emergente te indicará si ha sido satisfactoria la
descarga del mapa
(Fig. 14).
ATTENTION!
Walbro ECU:
Remove the 2-pin connector before turning
off the
ignition.

Fig.14
Recuperación de la Walbro ECU (TuneECU Versión de Windows):
Nota: utilizar la versión de Android, exclusivamente con FTDI convertidor USB cable/RS232
- Wait
for the message "ECU not responding ..." and select Cancel
- Select menu "ECU" <Recovery>
- Always
follow the instructions on
the screen.
On the
final process,
the final message "ECU
fully restored"
Confirm by clicking "OK"
The following changes apply to the Android version
of TuneECU and Walbro ECU
Recuperación de la Walbro ECU (TuneECU Versión de Android).:
- Menu "ECU" <Select> Benelli 899/1130 (This item appears only if you have a USB cableplugged on the android device)
- Menu "ECU" <Connect>
- Wait for the (first) message "ECU is not responding ..." and select OK
- Select menu "ECU" <Reprogram>
- Follow the instructions on the screen.
(of course you must be in the Map screen with a Map for your bike opened)
Resetear adaptación Keihin Sólo los modelos de Triumph, (not applicable for the Sagem models).:
Después
de una actualización (fig. 12) el adaptación debe ser reiniciado.
Apague el encendido y de nuevo,
espere 10 segundos y luego se apague el ignición.
Ahora gire el encendido de nuevo.
Una vez se ha restablecida la conexión con
TuneECU puedes continuar.
Arranque el motor y deje a ralentí hasta que el indicador de estado del TPS cambie a color verde (Después de 15 - 20 mins)
Resetear adaptación y / o inicialización de ejecución Sólo los modelos de K?M
After
downloading a FI-map, start the engine and run at idle (without
touching the throttle) for 15 minutes
and then the engine turn off.
990cc
models SD, SM, & Adventure:
After download from an new map, you must perform an initialization run.
The 990s must be on the center stand, and are thus stand vertically.
For SD / SM models use a Paddock Stands
or the side stand with a piece of wood underneath.
The engine must be cold.
There should be the coolest possible air temperature outside, this can
be very helpful for a lower fuel
consumption.
Start the engine and let it run at idle for 15 minutes. During these 15
minutes, not use the throttle or
any other functions.
The 15 minutes need to be strictly adhered to, and must not fall below.
The time can only be exceeded by
a maximum of one minute.
Should the engine go out, then re-start ONLY, do not begin 15 minutes
again. (Source: German K?M Forum)
If you want to perform an
initialization run only, you must first reset in any case the
adaptation.
(Source: LC8 German K?M Forum)
New in TuneECU version 2.3.5 for K?M 990 & 1190
Reset
ECU after replacing or repairing the engine.
CAUTION: To
adapt the ECU to the change of parameters after replacement or repair
with
the replacement of the engine pistons, cylinders or cylinder
heads, a reset of the ECU must be performed.
If you omit this step,
the engine can have a dysfunction at idle for a long period.
- Connect the diagnostic cable, run the program and turn ignition ON.
- Wait until connection is established.
- Go to the tab "Tests" and double-click "Reset Adaptation".
- Wait for the message "Reset Adaptation done", exit the program and
disconnect the diagnostic cable.
- Run the engine at idle for 15 minutes without touching the throttle,
check the coolant temperature, stop the
engine in case of overheating.
690cc
models:
After
downloading a FI-map,
start the engine and let runnig it idle (without touching accelerator)
for 15 minutes,
then turn it off.
After
downloading a EP-map,
Following a mapping download into the ECU, turn off the ignition (key)
, turn on the ignition, slowly rotate the Throttle until full throttle
then slowly close the throttle, turn off the ignition.
Reset Adaption Triumph-Sagem-Lambda-models only
The manufacturer of Triumph motorcycles describes this process as follows:Fuel System
Adaption — e.g. Daytona 955i, Sprint ST,
Sprint RS, Tiger, TT600 and Speed Triple
(only Sagem models with Lambda)
The fuel system fitted to the above
models is adaptive. This
means that the engine management system will
self-adjust air fuel ratio (i.e.
the mixture setting) to its optimum level in order to ensure differing
running
conditions do not result in poor running.
During an adaption, the engine
management system examines
the air--fuel ratio as measured by the oxygen sensor in the exhaust
system and,
if necessary, makes an adjustment. In some cases, a single adaption may
be
sufficient but in others, more adaptions will be necessary.
An adaption take place when all the
following conditions are
met:
- Gearbox in neutral, clutch engaged.
- Coolant temperature 80 -- 100 °C
- Airbox temperature 21°C minimum
- Engine idling for 10 -- 30 seconds
Once adaption has taken place, the
settings are retained
ensuring that adaption is not necessary every time
the engine is started.
Particularly for new bikes, where the
engine has not been
run-in, it may be necessary for dealers to ensure adaption has taken
place
before handing the motorcycle over to the customer. This can, of
course, apply
at
any other times as well.
takes place automatically.
Blip the throttle every 30 seconds to start another adaption cycle.
When
coolant or
airbox temperatures are above or below adaption thresholds, allow
the engine to cool or warm-up before
continuing.
To check that adaption has been
completed, scroll the
Triumph diagnostic tool to DIAGNOSTICS--CURRENT
DATA--LAMBDA FUEL. in a correctly adapted bike, the lambda
fuel reading should show 0.0% (though
operators should note that the figure
will continue to change during engine operation but will settle at 0%
briefly
but regularly.
If reading higher than +3% or --3%
are seen continuously,
adaption is necessary and can be brought about
in the conditions mentioned
earlier (remembering that more than one adaption will be needed on
occasions).
If a stationary LAMBDA FUEL figure of
--19.6% is seen, download the correct tune for
the model in question
and begin the adaption process as described.
Finally, use of the SET LONG TERM
FUEL TRIM adjustment in
the Triumph diagnostic tool should be reserved
solely for when replacement ECMs
are newly fitted (or are transferred from another bike).
In clarification, the following described process should be not so correct.
1. Ensure bike is seeing a closed throttle position (CTP),
if not, then perform TPS reset.
2. Bike in Neutral
3. Coolant temperature between 80-96°C
4. Minimum air box temperature of 21°C
5. Now with clutch pulled, blip the throttle to 3000 RPM and let it drop back to idle for at least 30 seconds,
all with the clutch lever pulled in.
Check bike is adapted by viewing Lambda Fuel.
Figures should be "toggling" +4 to -4
Don't forgot to check IACV steps are 20 - 35
Resetear TPS Aprilia, Benelli & Triumph (Sólo para los modelos con Sagem ECU)
1. En modo de prueba, haga doble clic en "Resetear
TPS"
2. Turn off the ignition.
3. Turn on the ignition.
4. Start the engine and let it idle for one minute without touching the
throttle.
.
Resetear TPS
Benelli Walbro ECU
(TNT, Tornado 1130 & TREK modelos)
Nota: utilizar la versión de Android, exclusivamente con FTDI convertidor USB cable/RS232
En modo de prueba, haga doble clic en "Resetear TPS"
Eliminación
de
fallos.
<Menú>
ECU - Borrar
códigos de error
En
modo
"Diagnostico" o "Tests", esta opción permitirá borrar los
fallos y mensajes guardados por la ECU. Si estos errores no han sido
tratados
(por ejemplo un sensor defectuoso) seguirán generándose y guardándose
en la
ECU.
Opciones
<Menú>
Opciones
- Auto conectar.
Si
está
opción está
activada y el cable conectado, el programa se conectará automáticamente
a la
ECU y abrirá el modo de operación por defecto.
Muestra
la interfaz
utilizada para la conexión con la ECU. Es aconsejable utilizar un sólo
cable de
interfaz a la vez.
Attention New in version
2.3! Select the correct interface, for Keihin
and Sagem select "USB"
and for Walbro select "Serial"- and then the
correct COM port.
<Menú> Opciones
- Lenguaje
Aunque se ha tenido mucho
cuidado en la creacion de este documento el autor no puede
garantizar completamente su contenido y que se ajuste completamente a
la realidad.